
Administrators can add and manage users in Airship, Mediafly's content management system. Once users are added to the system, you can update their user groups and managing their permissions. If your org has GUM enabled, add users to GUM before proceeding.
- We suggest creating User Groups prior to adding users to structure how access will be managed.
- Add a user to one or more groups depending on what visibility they need.
- Assign access permissions on the group level for easier user management.
- Select Email this user with their new account instructions when creating new users to send the user a Welcome email and allow them to set their own password.
Creating a New User
Note: Only users with the Manage Accounts privilege can create and add new users.
To create a new user, do the following:
1. Log in to Airship.
2. Navigate to User Management under Users & Groups.
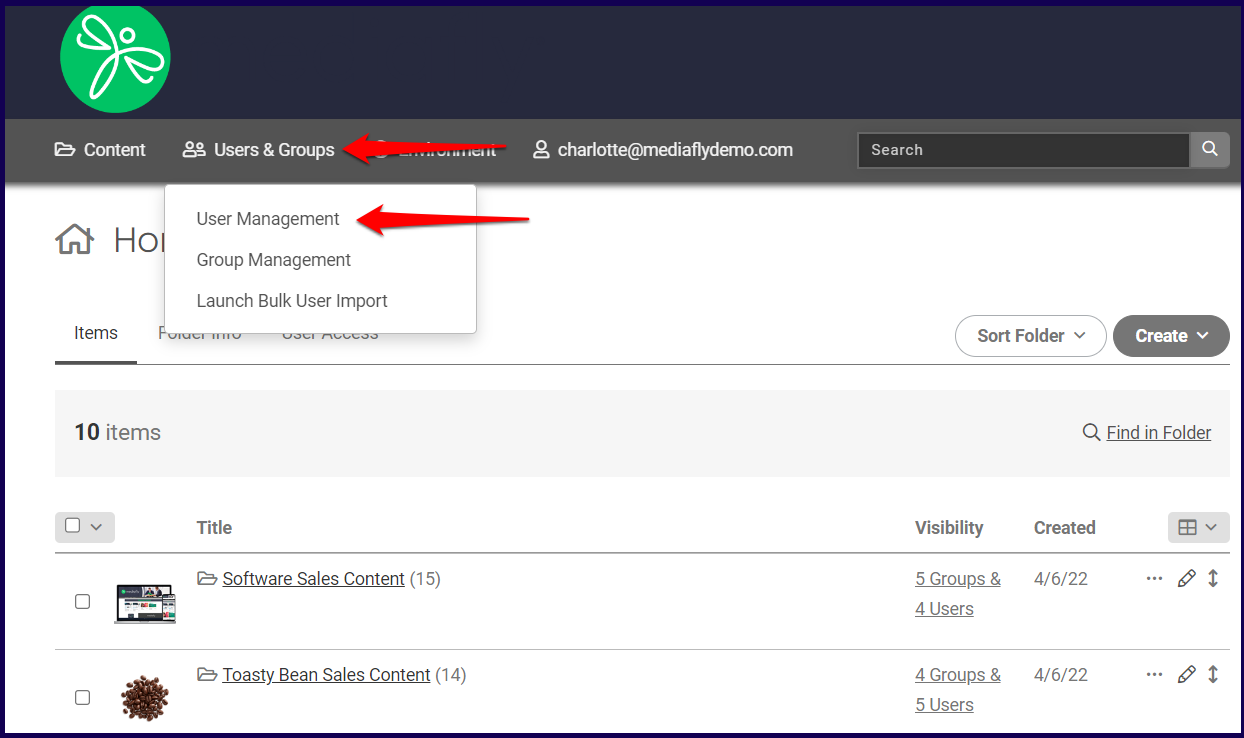
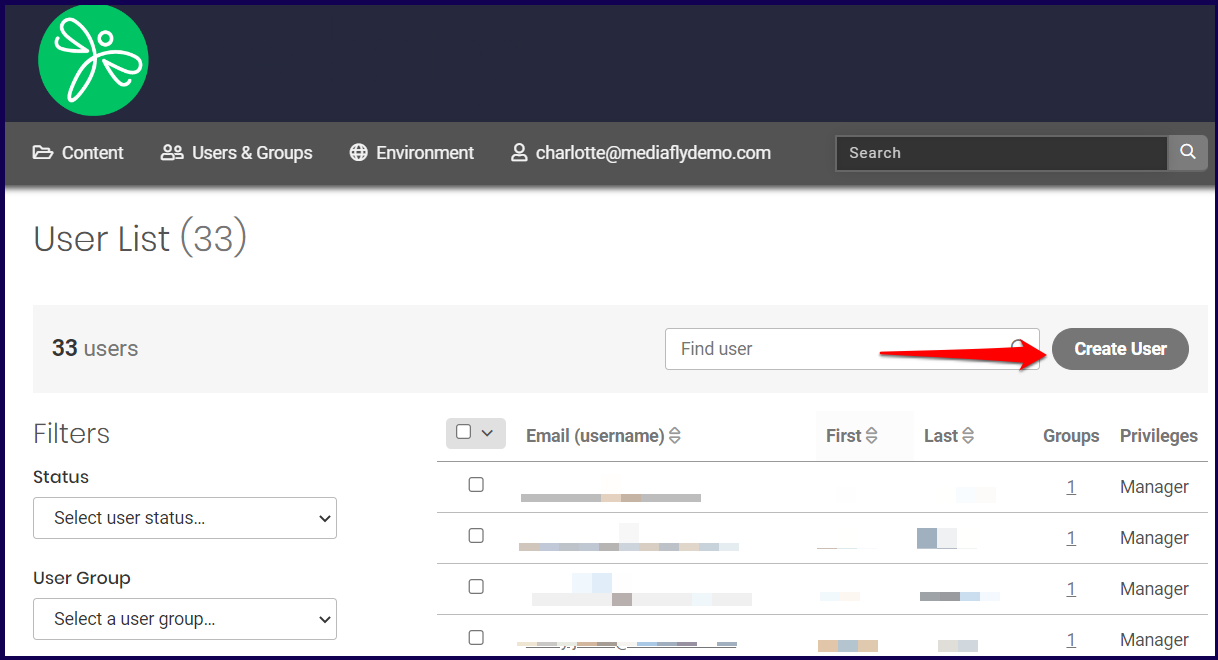
3. The User Management page is displayed. Click on the Create User button.
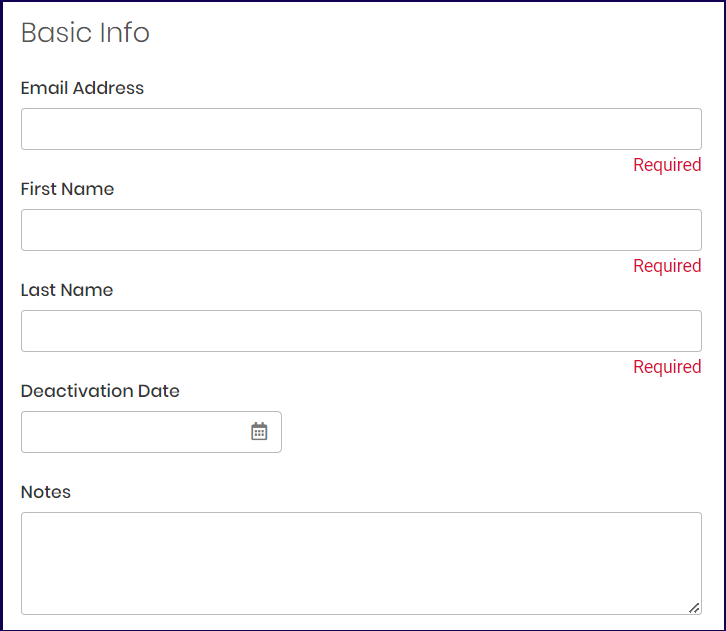
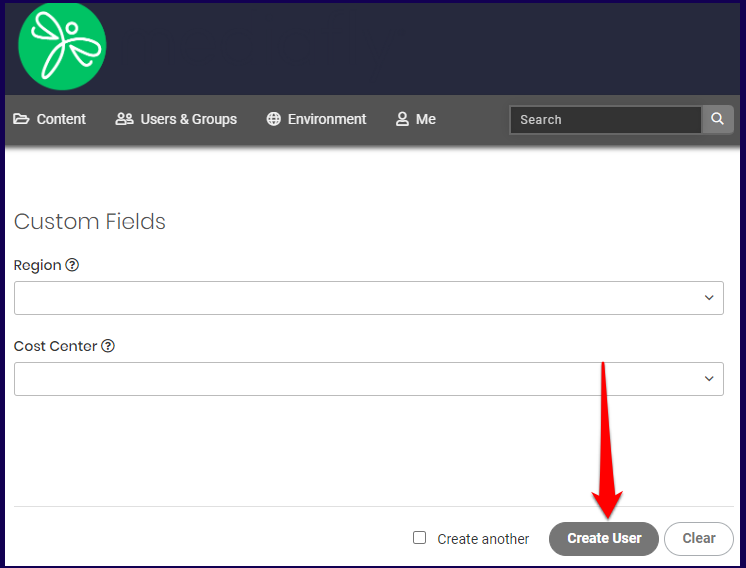
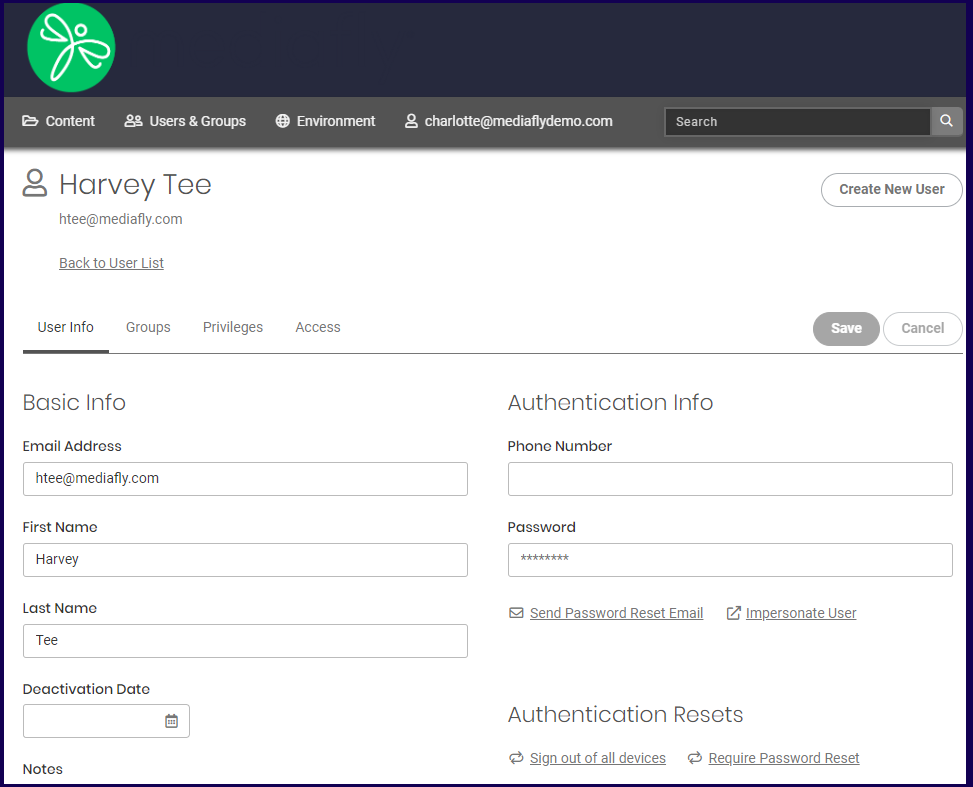
4. The Create User page is displayed. Specify the user details on the fields provided.
Create User Page
Basic Info section:
- Email Address- Specify the email address of the user. This field is mandatory.
- First Name- Specify the first name of the user. This field is mandatory.
- Last Name- Specify the last name of the user. This field is mandatory.
- Deactivation Date- Specify the date when the user's account is deactivated. If you want the user to have no deactivation date, leave this field blank.
- Notes- Use this to specify any notes about the user.
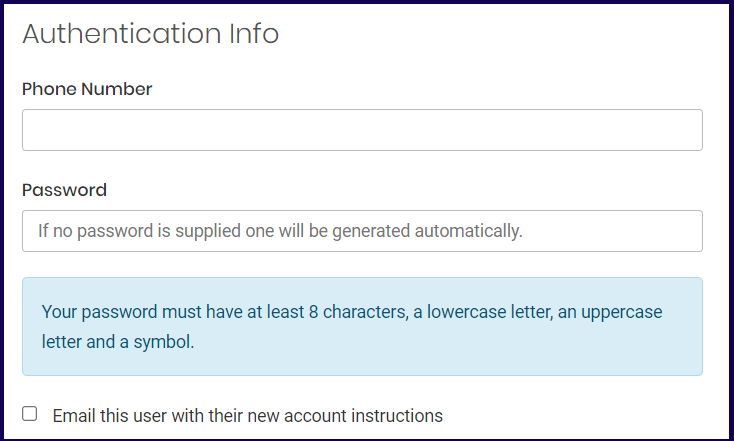
Authentication Info section:
- Phone Number- Specify the phone number of the user.
- Password- Specify the password that the user will use to login to the account. If this field is left blank, the system automatically generates the password of the user.
- Email this user with their new account instruction- Use this so that the created user will receive an email with the log-in instructions.
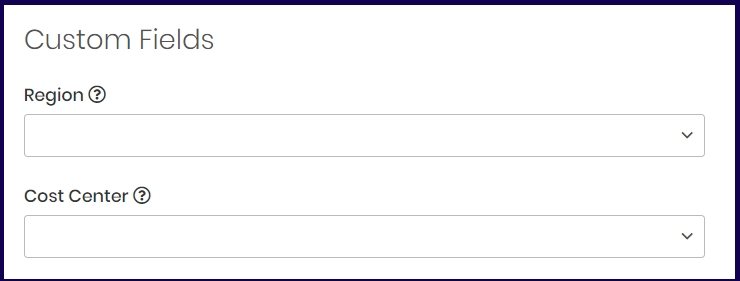
Custom Field section:
The custom field section list all custom fields created for the environment for specific uses to tag, identify, sort, users. For more information on custom field, see the Managing Environment Settings discussion.
5. Click on the create user.
Note: Mark the Create another checkbox to create another user.
Updating User Details
Note: Only users with the Manage Accounts privilege can modify user accounts.
To modify the details of an existing user, do the following:
1. Log in to Airship.
2. Navigate to User Management under Users & Groups.
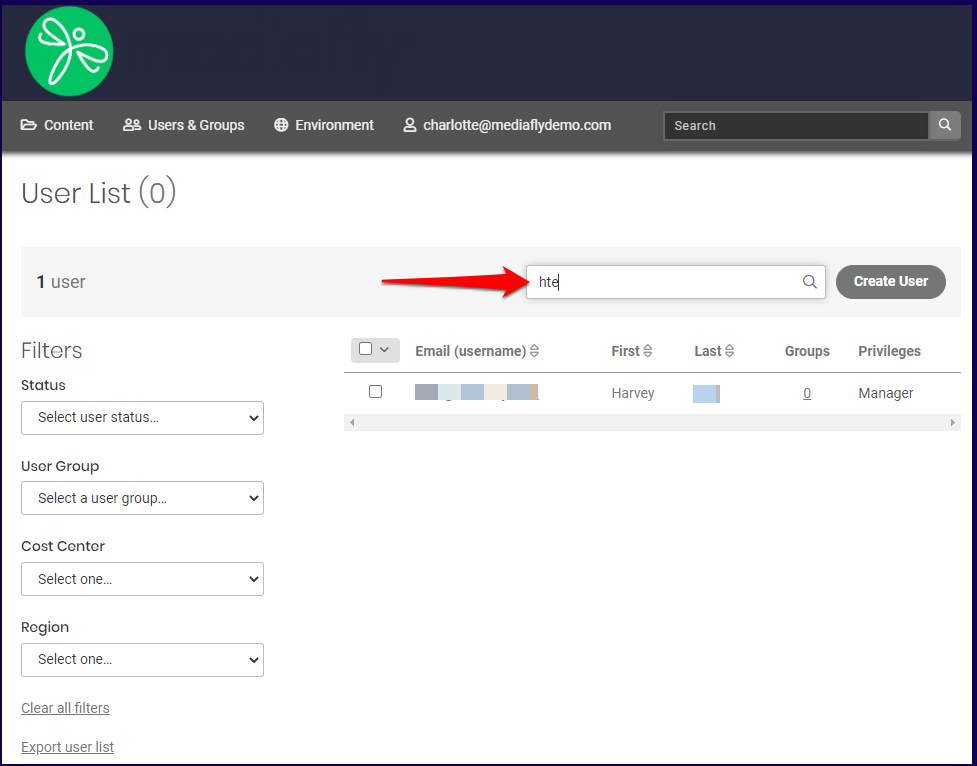
3. In the user list page use the search field to narrow down a user by name. You may also use the filters to filter out the search by Status, User Group, or any other custom field set in the environment.
4. The user profile is displayed on another page. Modify the information of the user on all four tabs and click Save.
Refer to the succeeding discussion for the User Info tab, the Groups tab, Privileges tab, and Access Tab.
User Info Tab
The user info tab presents the profile details of the user. The Basic Info section and Custom Fields section is similar to the one in the Create User Page. For details of each field, see the Create User Page discussion in this article.
Authentication Info section:
The User Info's Authentication Info section provides two additional buttons that may be used for resetting password, or testing user access.
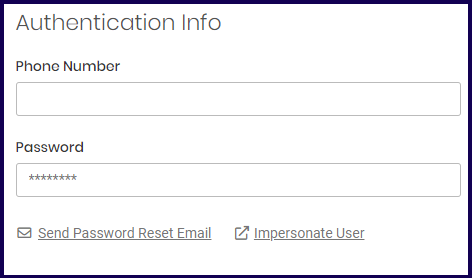
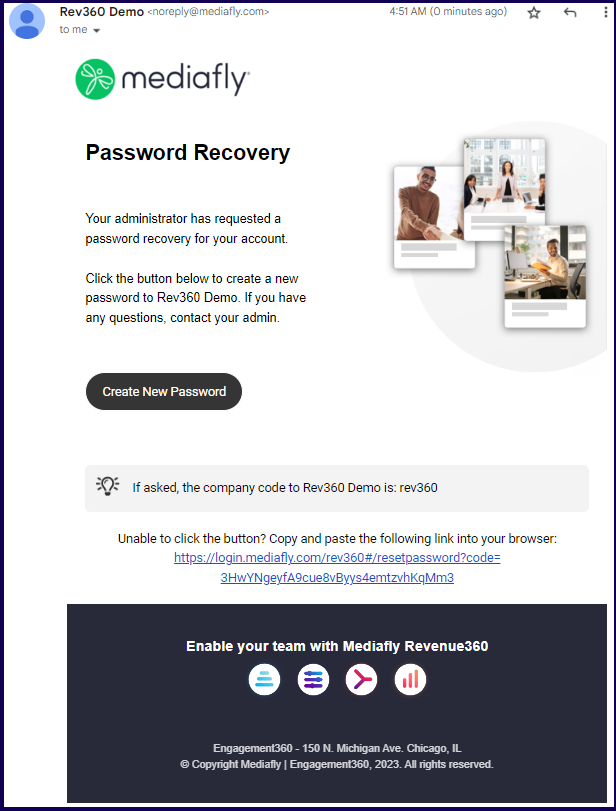
Send Password Reset Email
Use this button to send an email to the user to create a new password.
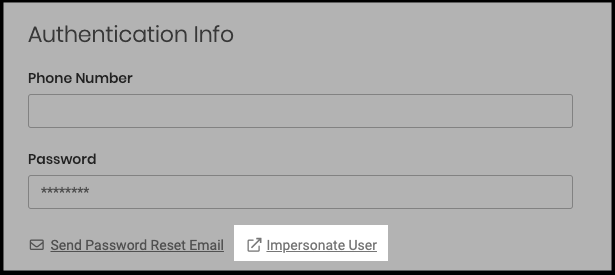
Impersonate User
Impersonating a user is available for admin with permissions to "Manage Accounts: for All Users" and allows them to log in and test the access of the particular user. This is used to test and view what an end user would have in the environment so that the settings and access of the user can be tested.
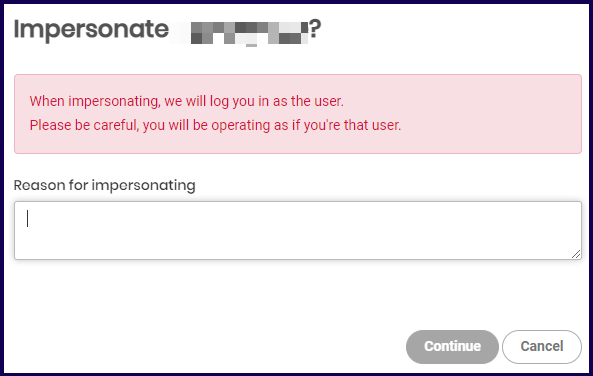
To impersonate a user:
- From User Management, select a user
- In the Authentication Section, click Impersonate User
- A prompt will pop up, enter the reason you're impersonating, then click Continue
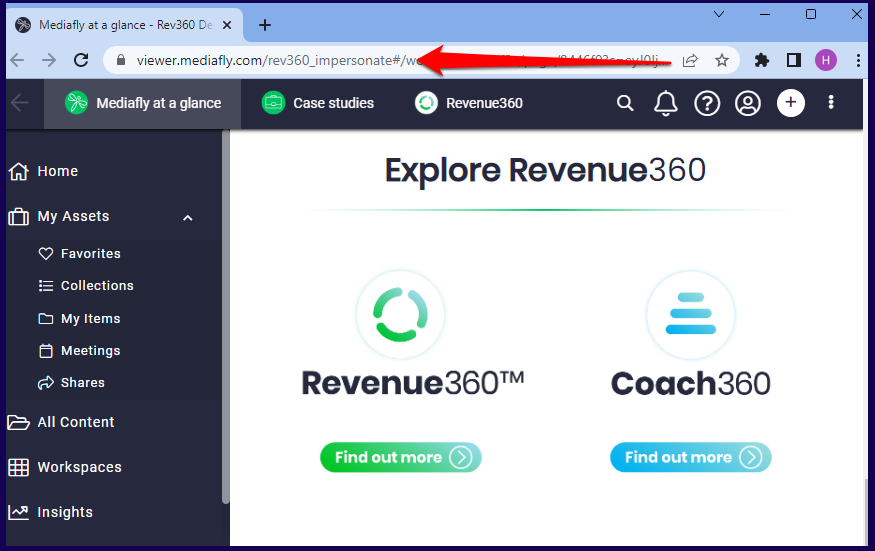
- The admin or manager will be logged impersonating the same level and access of the user. The URL of the logged in page will have 'impersonate' added to the environment code.
Note: While impersonating, the UI will be displayed in the language preference of the impersonator, not the impersonated.
⚠ CAUTION ⚠
If you ever need to view the impersonated user's account in their preferred language, you can change the language in the preferences screen to match what they were already using. However, do not switch it back to English while still impersonating, as this will change the customer’s language setting on their account.
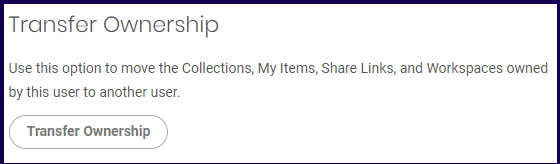
Transfer Ownership-
This button is used to transfer the ownership of the entire user account to another owner and preserve all collections, items, links, and workspaces created.
For more information on this feature, read the Transfer ownership of Collections, Workspaces, My Items, Shares action article.
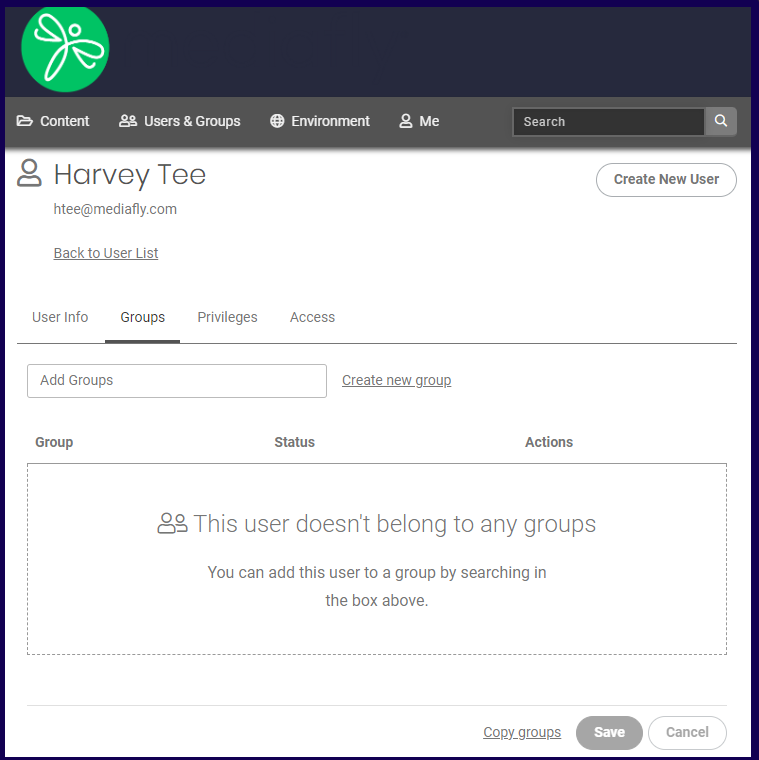
Groups Tab
This tab allows you to assign, manage or remove the groups the user is linked too.
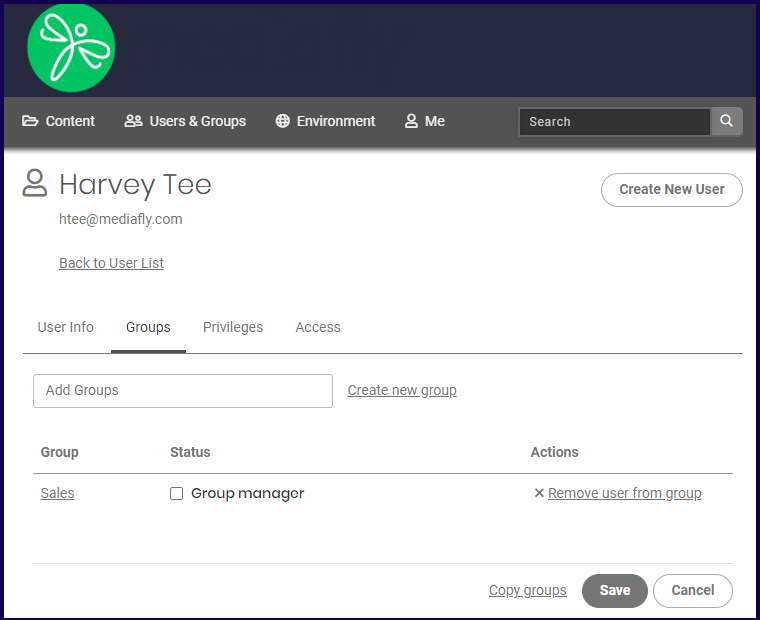
Adding Groups
The add groups field is used to assign a group to a user. The create group button is used to create a new group. For more information on assigning and creating groups, check the Creating user groups and assigning permissions discussion.
If no group is assigned to the user, the page displays instructions on how to add a group.
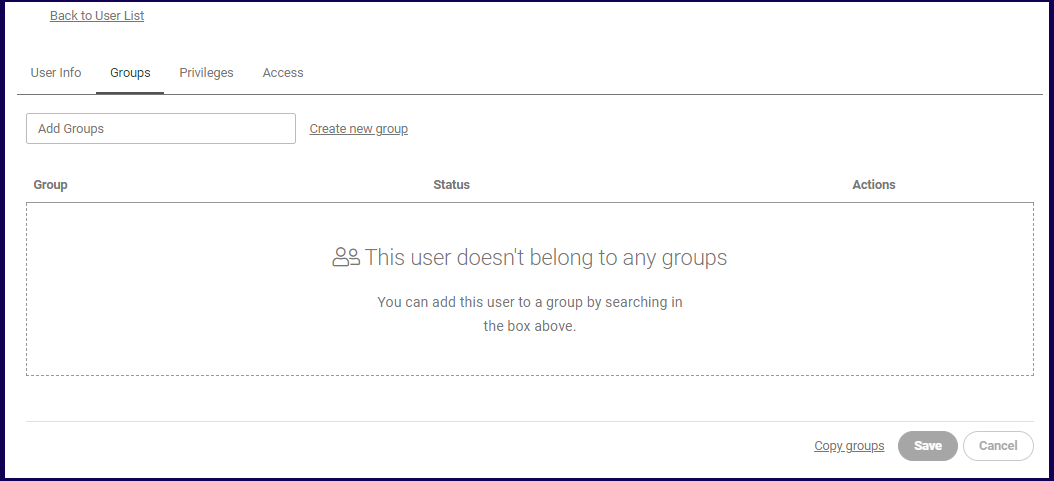
To add a group to the user:
Click on the Add Groups field and select a group in the list.
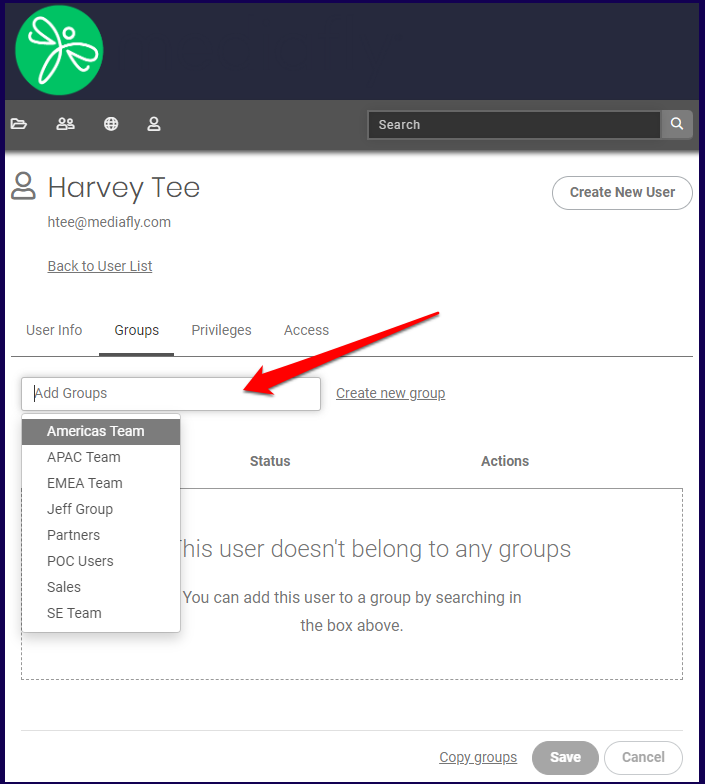
Once a group has been selected, the group is immediately displayed. Use the Add Groups field to assign another group to the user. To remove the user from a group, click on the Remove user from group.
Privileges Tab
The privileges tab is used to set the privileges of the user.
The privileges of the user dictates the access, controls, and actions that the user can do in the environment. The privileges enabled in this page is also dependent to settings set on Group Permissions and the User Permissions, in the User access tab of Airship's homepage. For more information about the permissions of the user, read the Managing Folder Permissions discussion.
The following Privileges may be set to the user:
1. View Content
This allows the user to view the contents of the environment.
Leaving this checkbox unmarked will results in the user inheriting the privileges set on the group(s) of which they are a member.

2. Share Content
This allows the user to share the contents of the environment.
Leaving this checkbox unmarked will results in the user inheriting the privileges set on the group(s) of which they are a member.

3. Manage Content
This allows the user to add, edit, or delete items in the environment.
You may set the users privileges to edit all items in the environment, or to give the user the editing access for only items that have the Manage Content permission enabled.

4. Download Originals
This allows the user to download the original assets in the environment.
You may set the users privileges to edit all items in the environment, or only items that have the Manage Content permission.

5. Manage Access
This allows the user to manage the access levels of other users.
You may allow the users to manage the access in the environment, or have the ability to manage the items that have the Manage access permission.

6. Prerelease Access
This allows the user to view the content before its release date.

7. Manage Accounts
This allows users to view manage other users accounts.
You may allow the users to manage all the accounts of other users in the environment, or allow only users in groups that have group manage permissions.

8. View Reports
This allows the user to gain access to view all Insights and usage reports. Read the Usage Reports documentation for more information on how to view reports.

9. Manage Site
This allows the user to be able to change environment-level configuration. Read the Managing Environment Settings documentation for more information on how to alter environment-level configuration.

Access Tab
The access tab allows users to edit the access of the user for their permissions in every folder level inside the environment.
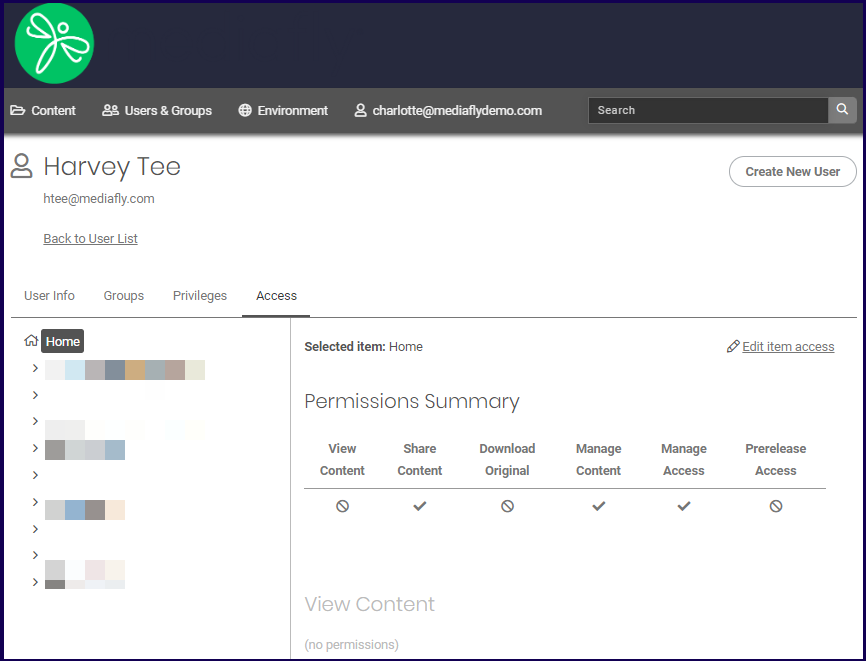
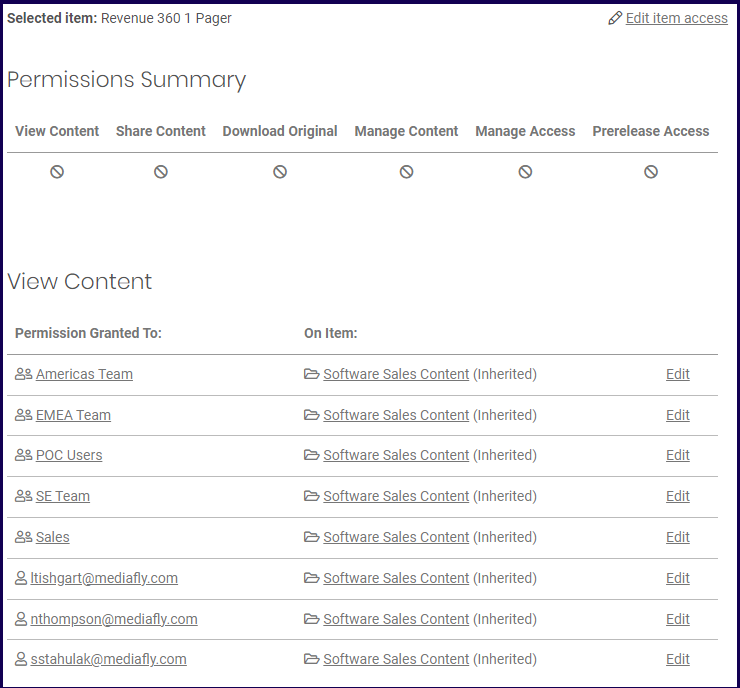
A Permissions summary of the user is displayed. Depending on the selected item or folder, the permission summary of the item is displayed.
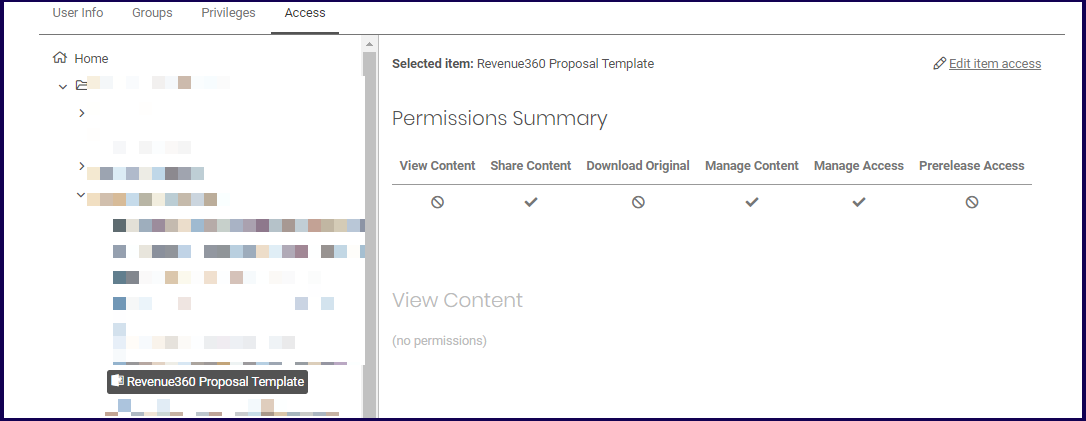
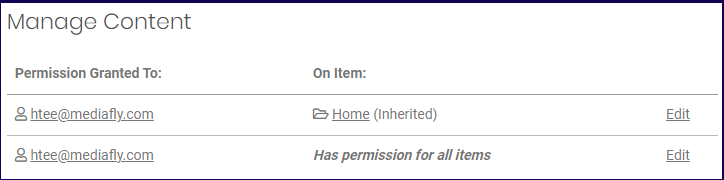
Click the Edit item access button to be routed to the user access page of the folder or item selected.
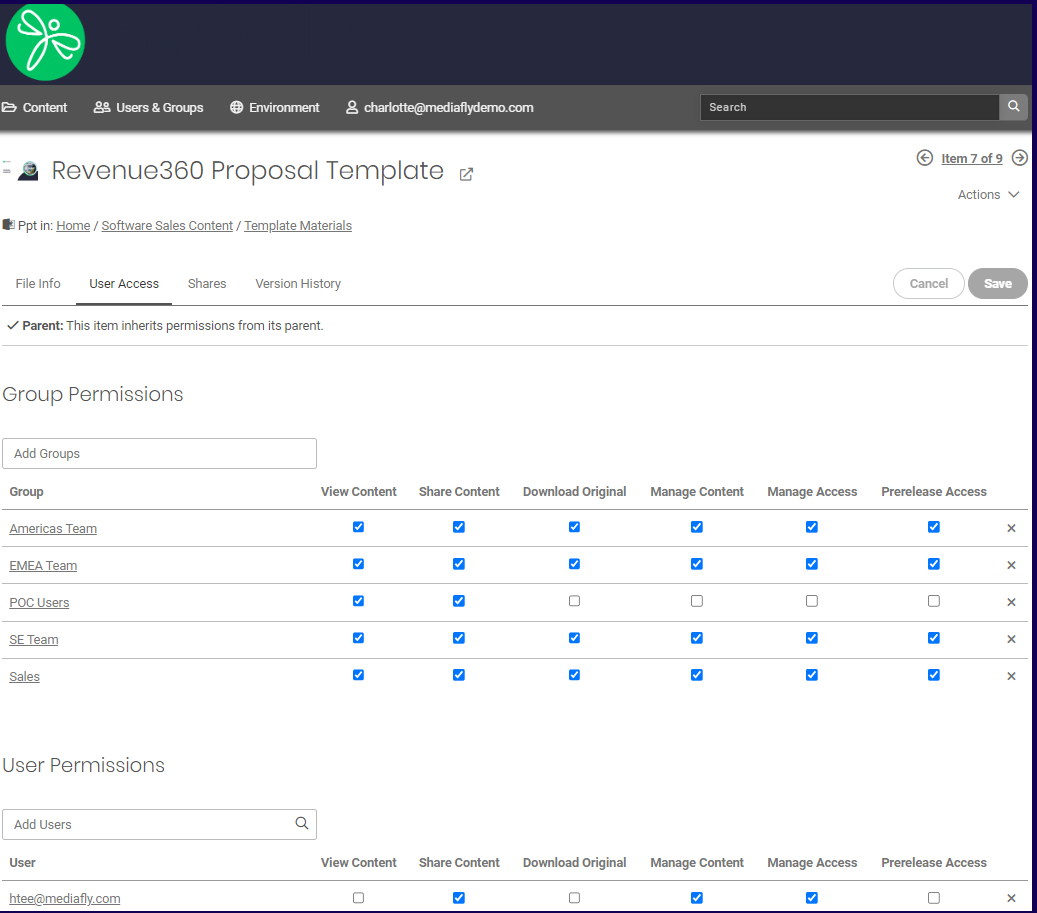
Each privilege enabled or assigned is being displayed along with the permission settings. Click on the Edit button to access the permissions of the user.
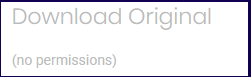
If no permissions are enabled for a particular user privilege, the area will be greyed out and a note indicating that no permissions is granted on this privilege.
For items or folders to which the user has no permissions to, or is in a group that has no permission to the item or folder path, all available teams and users that have permissions to the item or path are displayed instead.
Replies have been locked on this page!