
An Action Plan is a shared checklist that helps makes it easy to see what needs to be done, who’s responsible, and when each step is due—all in one convenient place
Action Plans are built inside Digital Sales Rooms (DSRs) so that everyone involved can collaborate directly where the deal happens, rather than using separate spreadsheets or tools. This keeps every action and deadline visible to both sides, streamlining communication and making sure nothing gets missed.
- Creating an Action Plan
- Adding & Editing Sections
- Adding, Editing & Updating Tasks
- Notifications
- Managing External Participant File Uploads
- Archiving & Restoring Action Plans
- Value & Common Use Cases
- Best Practices
Creating an Action Plan
Note: You must already have a DSR created and only internal team members can give view/edit access to external users to access Action Plans.
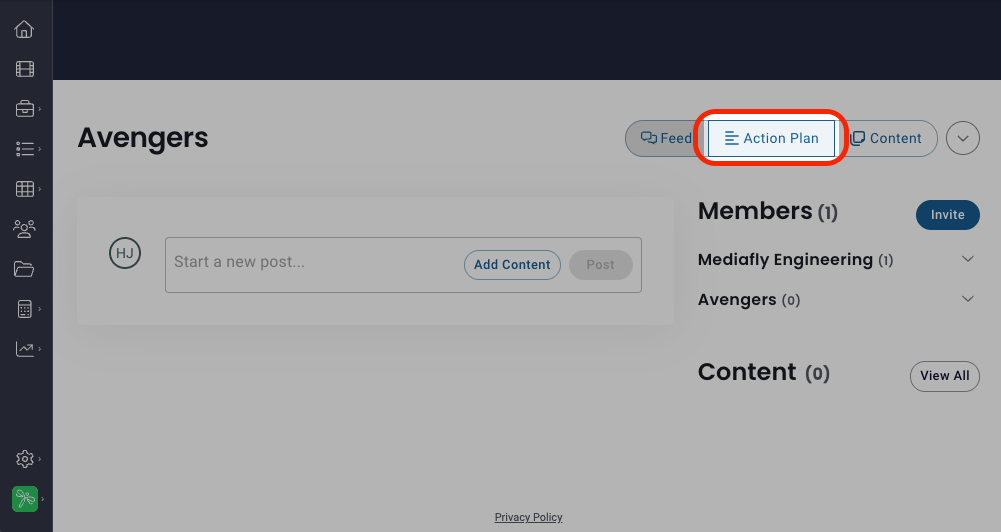
- In your DSR, click Action Plan
If you do not see this option, you are not the owner of the DSR and you have not yet been given access. - Establish view/edit access:
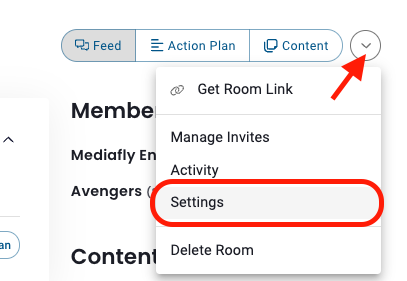
- Click the DSR menu dropdown and select Settings
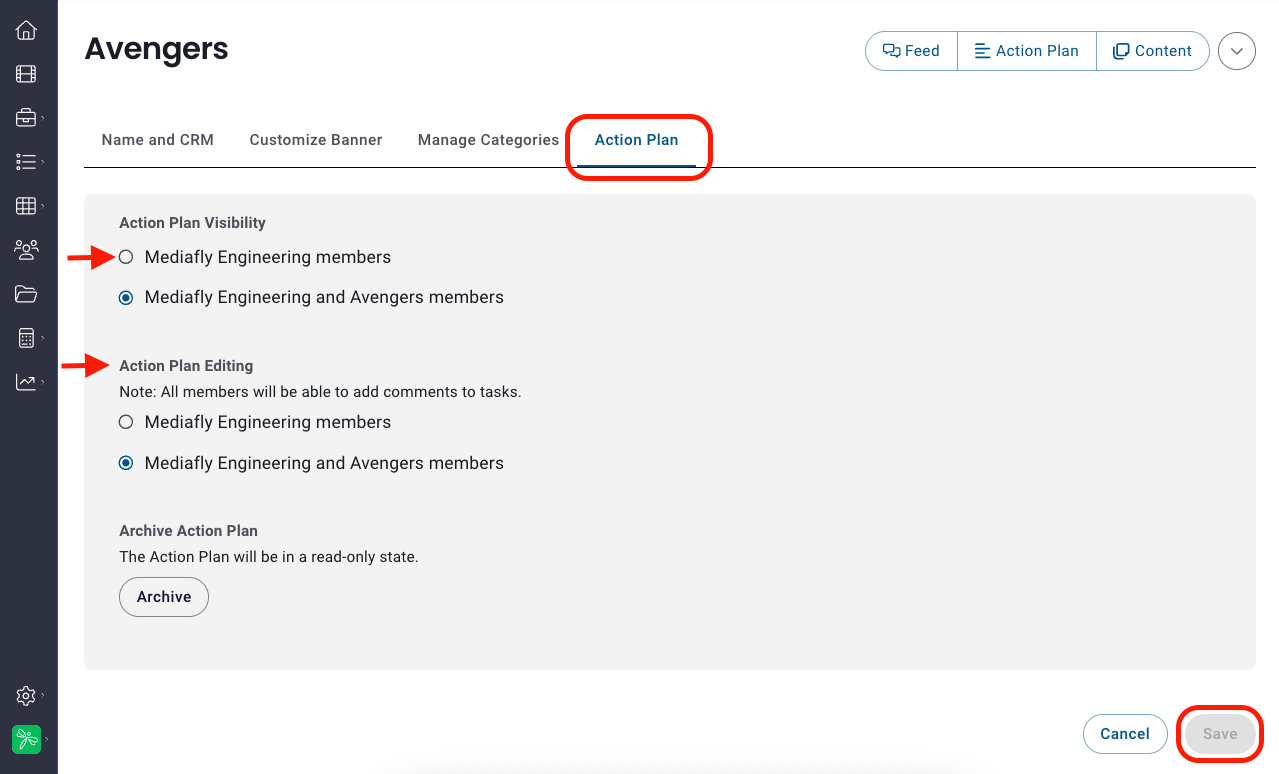
- Click the Action Plan tab
- Determine visibility by selecting one of the following:
- {Environment Name} members (internal users) OR
- {Environment Name} and {DSR Name} members (internal and external users)
- Determine edit access by selecting one of the following:
- Only the Room Owner OR
- {Environment Name} members (internal users) OR
- {Environment Name} and {DSR Name} members (internal and external users)
- Click Save
- Click the DSR menu dropdown and select Settings
- Click under “Overview” and type in an outline or description of the Action Plan that you want all viewers to see.
Managing an Action Plan
Adding & Editing Sections
A section is a group of related tasks organized under a specific part of the plan. Inline with the section title you can see section progress, expand/collapse to view/hide associated tasks, and the section edit menu icon.
Add New Section
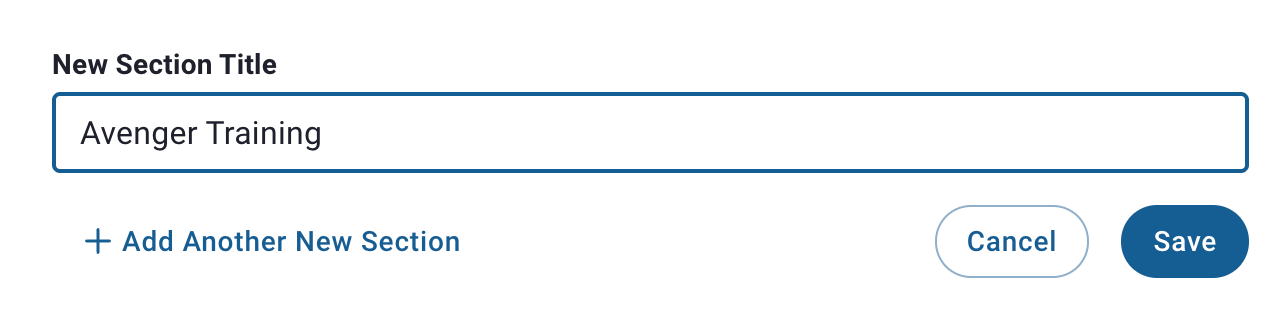
- Click + New Section
- Create a Section Title
- Click Save
Edit Existing Section
Click the 3 dot menu inline with the Section title and select from the following:
- Edit to edit Section title
- Duplicate to duplicate the section (the section will be duplicated but will not carry over progress for each task or the section itself)
- Move to will allow you determine where in the order of existing section you want this section to be
- Delete prompts you with the following: “You’re about to delete a section containing 2 tasks. You can move these tasks to another section in the action plan, otherwise, both the section and its tasks will be permanently deleted.” then give you the option to move the existing tasks to another section.

Adding, Editing, and Updating Tasks
A task is an action that needs to be completed, with details about what, who, and when. Inline with the task title you can see start date, due date, task description, owner(s) icon, if the task is overdue, the comment icon, and the edit task menu icon.
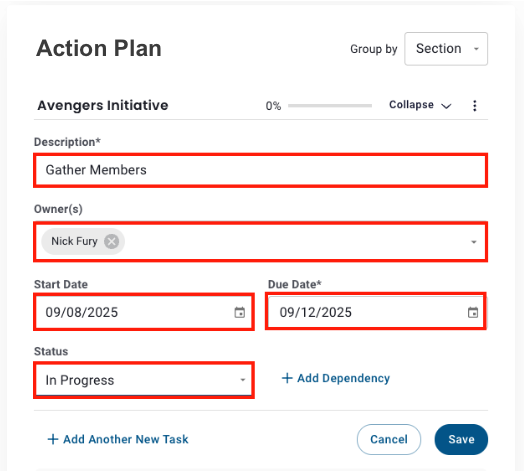
Add New Task
- Click + New Task
- Enter the following:
- Description
- Owner(s) (task owners must be members of the DSR)
- Start Date
- Due Date
- Status
- Task Dependency (optional - click here to learn more about add dependencies)
- Click Save
Edit Existing Task
Click the 3 dot menu inline with the Task title to:
- Edit a task’s description, owner(s), start date, due date, status, or to add a dependency (you can also update the status of a task without opening this menu)
- Duplicate to duplicate the task (will task be duplicated but will not carry over progress, the duplicate will be placed in the same section but can then be moved to another.
- Move to another section, section options will be populated for your selection.
- Activity allows you to see all activity specific to this task in a right drawer pop (you will see update, comments, creation, changes, etc.)
- Delete prompts you with the following: “Are you sure you want to permanently delete this task? This action is permanent and cannot be undone.” then the option to cancel action or delete the task.
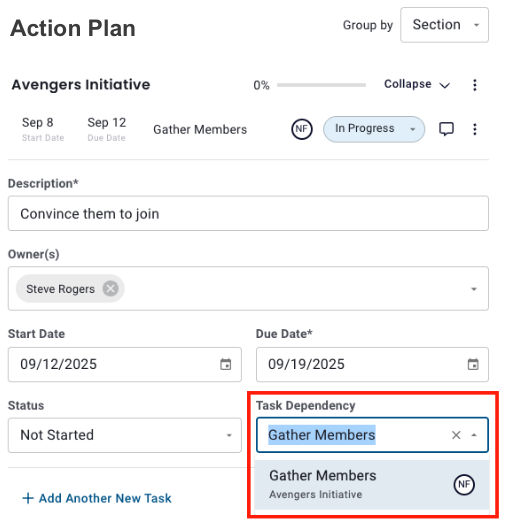
Adding Task Dependencies
Dependencies let you Action Plan out the right order for work and make it easy for everyone to collaborate without accidentally skipping critical steps. You will only have the option to add a dependency if at least one other task exists.
- In a task creation or editor, click + Add Dependency and select from the list of tasks populated
- These two tasks will now be linked in the Action Plan to illustrate when one task is dependent on the completion of another.
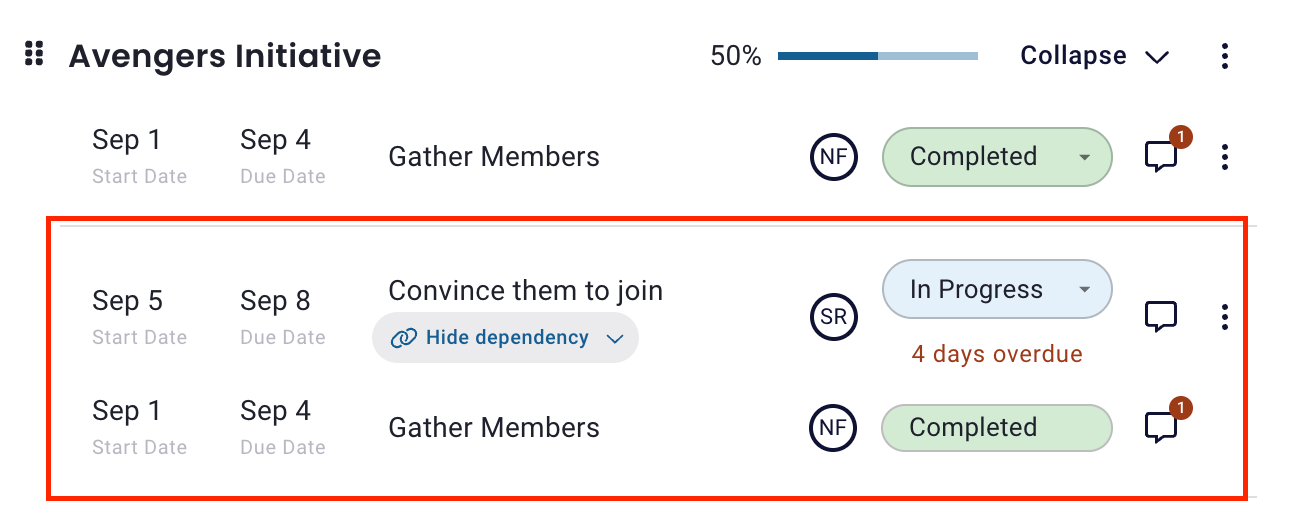
Updating Task Status & Reading/Adding Comments
Directly on the action plan, you can:
-
Update task status by clicking on the status dropdown and making a selection, this selection will automatically update & save
-
Read or leave comments by clicking on the comment icon (there will be a red circle on the comment icon if there are comments)
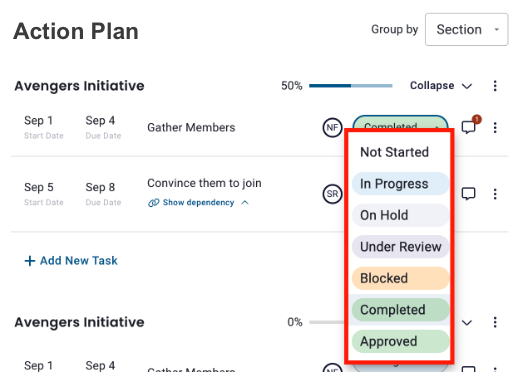

Group By
You can change the Action Plan view for a flexible perspective on how things are progressing. Simply select your desired view from the Group by dropdown.
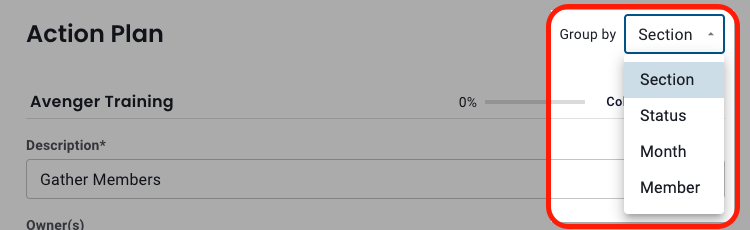
- By Section (default view) shows tasks organized under each main part of the plan. This makes it easier to see related tasks together, follow progress for specific phases, and quickly find what needs attention in each area of the project.
- By Status allows you to see which tasks are moving forward, which are stuck, and what’s already done. This makes it easy to identify blockers and prioritize attention to where it’s needed most. (Not Started, In Progress, On Hold, Under Review, Blocked, Completed, Approved)
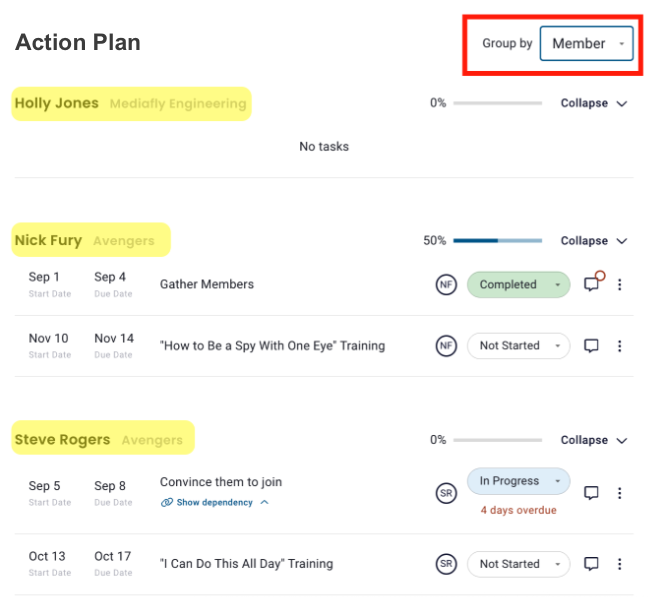
- By Member lets users quickly view who’s responsible for what and is useful for tracking individual contributions, following up on specific assignments, and ensuring no one’s overloaded or missing key steps.
- By Month (Ascending or Descending) lets you view tasks by their due dates, organized month-by-month in either ascending or descending order, for a clear timeline of upcoming deadlines and milestones, so you can keep deals or projects on schedule.
Example: Group by Member
Notifications in Action Plans
Keep track of every important update in your Action Plans using both email and in-app notifications. You can configure your notification preferences at any time in your user settings to suit your needs.
Email Notifications
- Weekly Summary: Every Monday, internal participants receive an email summarizing all their active Action Plans, including overdue or blocked tasks. Only internal users receive these emails.
- Assigned Tasks: Whenever a new task is assigned or a comment is added to an assigned task, an automatic email notification is sent immediately to the internal user responsible.
- @Mentions in Comments: If you're mentioned in a comment using @, you’ll receive an email notification to review or respond.
In-App Notifications
- Blocked/Overdue Tasks: Internal team members receive real-time in-app notifications for tasks that are blocked or overdue.
- Assigned Tasks & Updates: You’ll get instant notifications when tasks are assigned, when comments are added to tasks you're responsible for, and when changes are made to those tasks.
- @Mentions in Comments: In-app notifications also alert you when you’re mentioned in a comment.
All notification types are configurable, so you can manage which updates you want to receive by adjusting your user settings.
Managing External Participant File Uploads
External participants can upload content directly into a DSR when collaborating on Action Plans.
Externally uploaded files are not stored or viewable within the Mediafly platform; instead, these files are only available for download by users within the DSR. If needed, an internal user with access can add the downloaded content to Mediafly.
- Upload Process: External users “attach a file” much like sending an email attachment. Internal team members in the DSR can view and download these attachments.
- Storage: Uploaded files remain outside of the main Mediafly content library and do not persist on the platform beyond the DSR.
- Access: Any user within the DSR can download the file as needed.
Archiving & Restoring Action Plans
Archiving an Action Plan puts the Action Plan into a read-only state. This means no changes can be made to the plan while it is archived, but it remains accessible for reference or record-keeping. If needed, you can restore an archived Action Plan back to an active, editable state. Archiving is typically used for closed or completed Action Plans to preserve a snapshot of the collaboration and progress for future review or compliance purposes. Action Plans can only be archived/restored by internal users.
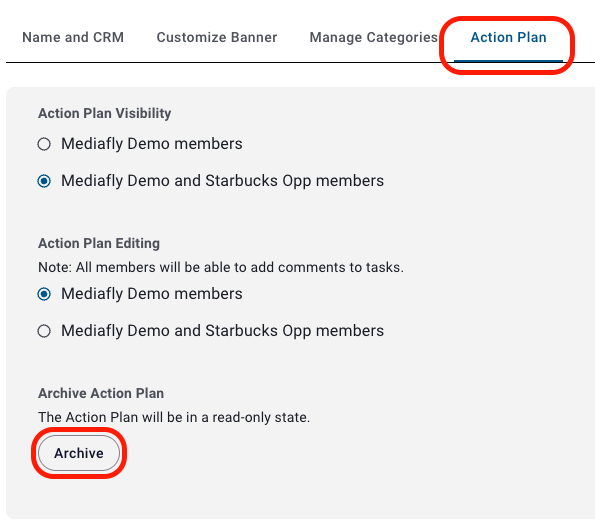
To archive or restore a Action Plan:
- Click the DSR menu dropdown
- Select Settings
- Click the Action Plan tab
- Click Archive: The Action Plan will then be in a read-only state
- Once archived, you can click Restore to restore the Action Plan to a live state
- Click save after archiving or restoring a Action Plan
Value & Common Use Cases
What value do Action Plans deliver?
- Deal Progress Tracking: Action Plans provide a clear, visual timeline of required tasks and milestones, keeping deals on track and making it easy to identify blockers or delays.
- Accountability: Assigning task ownership ensures responsibilities are clear, reducing confusion and missed deadlines.
- Buyer Engagement: Action Plans help sellers “stress test” buyer commitment by detailing every step required post-verbal agreement, showing that simply saying “yes” doesn’t complete the deal.
- Transparency & Collaboration: Real-time access and updates mean both seller and buyer can see and act on changes immediately, eliminating version-control issues from emails or spreadsheets.
Common Use Cases:
- Closing a complex deal that requires multiple stakeholders and coordinated actions
- Managing post-sale onboarding, migration, or value realization projects
- Unpacking legal, procurement, or technical steps before final agreement
- Ensuring both internal and external parties remain informed and accountable throughout the sales cycle
- Outlining onboarding steps for post-sale teams and ensuring everyone’s expectations are aligned
Best Practices for Action Plans
Co-Create the Plan: At kickoff, build the Action Plan together with both buyer and seller to ensure buy-in and proper alignment.
Be Specific With Tasks: Break milestones into discrete, actionable tasks with detailed descriptions and clear owners.
Set Realistic Dates: Agree on start and due dates for each task, factoring in organizational dependencies and typical timelines.
Maintain Visibility & Permissions: Keep Action Plans visible to relevant parties and update as stakeholder roles change.
Communicate Status Updates: Encourage frequent updates on task status using built-in notification features.
Utilize Comments and Collaboration: Leverage commenting features for asynchronous communication on specific tasks, avoiding siloed communications.
Archive When Complete: Archive closed or completed Action Plans to preserve a “read-only” record for future reference or deal retrospectives.
Replies have been locked on this page!